
This week’s guest is my darling cousin Lori, who happens to be in Phoenix right now on tour with her boyfriend Stu and his band Antique Scream (they are awesome and you should check them out). Now, I love my cousin dearly, and she’s a highly intelligent girl, but when she goes on tour with the boys, they tend to lose IQ points for whatever reason. Maybe it’s all those hours in the van. They should probably check the exhaust. I hear CO2 emissions can not only kill you in a confined space, but shed those points at neck-breaking speed. Hey, there just HAS to be some explanation for the world heading into Idiocracy. I just find it hilarious, along with the email I received today that had this recipe attached.
Ok, so I wrote this at like, noon. And then I fucking FORGOT TO EMAIL IT TO YOU! Because I lose like, 10 IQ points a week while I’m on tour.
-L
You’re not offended by the swearing, right? Because I do that all the damn time on this blog. Welcome Lori to Jinxie’s Kitchen and check out the great recipe she’s sharing below (*ahem* I’m trying to get the tiramisu recipe out of her).
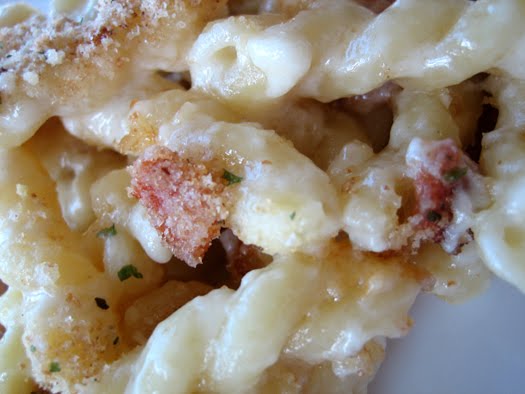
Grown Up Mac N’ Cheese
Ingredients:
1 bag pasta
1 stick of butter
2-3 tablespoons flour
1 cup milk
3 or 4 strips of bacon
2 garlic cloves
½ small onion
16 oz cheese (I prefer medium cheddar)
1 teaspoon chili powder
Sal t and Pepper to taste
Italian Bread Crumbs (optional)
I love this recipe. I make it for my man and his friends. Guys go nuts over pretty much anything with bacon (it’s the candy of meat!), but add it to a nostalgic childhood food like Mac n’ Cheese…? Instant success.
For this recipe you’ll need a knife and cutting board, a medium sized sauce pan, something to boil pasta in (another saucepan, dutch oven, whatever), a colander, an oven safe baking dish (I use a glass 9” x 13”), a cheese grater, kitchen sheers, a whisk, and a spoon or rubber spatula.
To prep, shred your pound of cheese. I prefer to use a medium cheddar, but any cheddar would work. I’ve also used Colby Jack, and I suppose Pepper Jack would work for those more adventurous sorts. Set the shredded cheese aside, and peel and dice your garlic cloves and onion.
Start the water boiling, the heat under your sauce pan, and preheat your oven to 350. Unwrap the top of your stick of butter, and rub it on your baking dish. This is so your pasta will not stick to the pan.
In the sauce pan, add your diced garlic, diced onion, and the bacon. You can fuss around with a knife and cutting board to slice it into pieces (which is annoying and greasy), or you can use kitchen sheers. Hold the 3 or 4 slices of bacon (still stuck together from the package) and just snip them into pieces, right into the pan.
Fry the bacon, garlic and onions until the bacon reaches desired crispiness. Personally, I prefer chewy. Once you’ve reached bacony goodness, add the stick of butter, and melt it completely. You should have a deliciously sinful combination of bacon grease and butter in the pan. Sprinkle the flour and chili powder into the cardiologist’s nightmare, and use the whisk to stir it around. It should reach a paste like consistency. If it’s still too greasy, sprinkle a little more flour in until it is not. This is called a roux, and there are lots and lots of how to’s on the internet if you have trouble with this stage. A pretty basic rule of thumb, is that however much milk you add, is how much cheese sauce you will end up with.
If you want a little more, add more milk. A little less sauce, use a little less sauce. It’s up to you. The measurements above are more of a guideline. At this stage, add the milk slowly, while stirring (so not to make a mess or scorch the milk.) Once you’ve thoroughly mixed the milk and the roux, begin sprinkling the shredded cheese in there, stirring constantly, so it mixes and melts evenly. I use about half of the remaining cheese at this point, sometimes a little more, depending on my mood.
Keep an eye on your water. You’ll have to do this simultaneously with the sauce. Luckily, it’s much more low maintenance. Once it’s boiling add the pasta. I like to use elbow macaroni, but you could use bow tie, spiral, or ziti. However fancy you want to look to your friends. Once the pasta’s done, drain it and put it in the glass pan. I like to toss some of the shredded cheese in with the pasta, mix it around, and let it sit while I’m finishing the sauce.
Once the sauce begins to thicken, you’re good to go. Turn off the heat, and use a spoon to taste a little of the sauce. Salt and Pepper to taste (I do just a tiny bit of salt, and lots of black pepper.) If you’d like the mac to have a bit more kick, add a little more chili powder.
Spoon all of the sauce over the noodles. Carefully mix the pasta and the sauce together in the pan, until the pasta is uniformly coated. Use the rest of the cheese now, and sprinkle it across the top. If you’d like a crunchy top, sprinkle bread crumbs in with the shredded cheese. You could even get super fancy and put bacon crumbles on top.
Put the pan in the oven, and let it go until the cheese across the top get’s brown and bubbly. (Usually about ten minutes.) When you take it out of the oven, let it sit for another ten minutes or so. Unless you enjoy burning your taste buds off with lava-hot cheese. I know it will be difficult to wait (the smell will drive you mad in anticipation), but it will be worth it. I promise.
Thank you Lori for stopping by Jinxie’s Kitchen! Next week…..well, I don’t know what I’m posting yet, but I’ll work on it this weekend. =)
Piacere!
Vive bene, spesso l’amore, di risata molto!
(live well, love much, and laugh often)